


Rejection occurs from the application of a higher surface tension coating over a lower surface tension surface – the classic ‘water on wax paper’ effect.
Possible causes relate to those factors that might make for the surface below to be of a lower surface tension. These could include:
-
Surface below is too glazed or too smooth
-
Concrete curing agent present; especially wax type
-
Contamination on surface
-
Admixtures in concrete for greater water repellency, e.g. Stearic Acid
-
Densified surface reduces ‘wetting’ effect of applied coating
-
Incompatible coating types
Avoidance is based on ensuring the ‘wettability’ of the concrete surface. The water droplet or small puddle soak-in test is valuable as is applying a small test area of the intended coating onto the concrete surface.
Remediation options include:
-
Grinding off the rejected coating back to bare concrete
-
‘Wetting’ or ‘activating’ the rejected surface with a surface tension increasing fluid such as Ecoshield's re-coating fluid and applying another coat. This will reduce the severity of the condition and maybe client acceptable but some effect will still be apparent. A test area is recommended for this option.
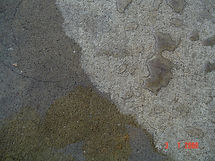
CONDITION ONE
Rejection (Cratering)
Loss of Wet Edge / Overlap Marks
CONDITION TWO


Most overlap marks are caused by application of coating over an area of coating that has commenced to dry and has lost flowability. In this example the contractor ran out of coating product and left premises to obtain more – upon return and then applying the rest of the coating to the previously applied coating that had started to set up, the result being the rough orange peel overlap junction.
Possible causes include:
-
Too long a delay in the overlapping or joining up of coated areas.
-
High temperatures at application so rapid loss of wet edge property
-
Coating applied too thin so it dries quicker
-
The applied coating is starting to set up and thickening (increasing viscosity) with reduced flowability and leveling.
Avoidance:
-
One person mixes and pours and another person spreads if possible when coating larger areas.
-
Pour and spread as soon as possible after mixing of components
-
Apply in the cool of evening on hot days. Outgassing bubbles can occur if coated early on a hot day as slab heats (see later Osmotic blistering).
Remediation options include:
-
Abrading the ‘orange peel’ effect wet edge loss marking to make flat. Then applying a rectification coat over the entire floor
CONDITION THREE
De-lamination / Peeling


De-lamination is a separation of the applied coatings from the substrate or coated surface below it.
Possible causes include:
-
Clean surface on the underside of the separated coating:
-
Contaminated surface
-
No substrate surface wetting by the coating (surface too smooth, water repellant admixture in concrete, curing agents on surface of concrete)
-
Incompatible coatings with one layer peeling off the other
Adhered material to underside of coating:
-
If self-leveling compound
-
Too much water in leveling compound mix can make it powdery or have less cohesive (internal) strength
-
No, or inadequate abrasion or priming of the surface prior to leveling compound use
-
-
If mainly cement
-
Possible laitance from excess water on surface of concrete at pour or prior to cure.
-
Cement or sandy material spread on surface after slab pour
-
Heavy rain on slab soon after pour
-
Water in de-lamination blisters:
-
Osmotic blistering as per the above lower right hand photo. Water within slab diffuses to the surface and meets an impervious membrane coating (Epoxy, Polyurea or Polyaspartic). Hydrostatic pressure leads to blistering or localised de-lamination of the coating.
-
Salts visible at de-lamination
-
Efflorescence can force a coating from the concrete surface
Avoidance:
-
Check for wettability of surface to be coated prior to coating by using water beading test (see below).
-
Diamond grind to ensure surface contamination or smoothness removed.
-
Hit self leveling compound with a hammer to see if it fractures off the substrate or crumbles easily.
-
Firmly apply and drag a screwdriver over the substrate surface. If Powdery and easily disturbed, then possible laitance, poor concrete mix, excess sand in surface layers from overworking surface or too much water contacting surface prior to cure, might be an issue.
-
Too highly glazed by steel troweling to a shiny surface. Diamond grind to roughen surface to increase surface tension for better wetting of the coating and also to allow for more mechanical adhesion of the coating.
-
Use Eco Bond to enhance adhesion properties by functioning as a tie coat.
-
Efflorescence can be virtually avoided by use of penetrating and densifying coatings such as Eco Seal and Eco Densi Shield.
WATER BEADING TEST:
Apply beads of water to slab and wait for 1 minute.
Water should soak into slab and not be left on the surface in a bead.
Left hand side is a pass - Right hand side is fail
Remediation:
-
Grind back to bare, confirming water bead test and surface integrity via screw driver scrape and then resurfacing.
-
If surface soft and friable the use penetrating sealer Eco Seal, Densify with Eco Densi Shield.
-
If water bead test is still not promising after the diamond grind then apply Eco Bond as an adhesion promoting tie coat.
Efflorescence
CONDITION FOUR


Efflorescence is the white powdery substance on the surfaces of unsealed concrete and the white blush seen with sealed floors such as the acid stained floor above.
Primary efflorescence is caused by water in the new concrete evaporating leaving soluble salts on the surface.
Secondary efflorescence is caused by water coming from underneath the slab or water introduced onto the surface after cure; sometimes years later.
Possible causes:
Primary efflorescence:
-
Addition of calcium Chloride admixture to assist in slump and to accelerate set time of the concrete
-
Low fly ash level in concrete
-
Excessive water added
Secondary efflorescence:
-
Ground water seeping into slab
-
Saturated base material
-
Excess water on surface during treatment process e.g. rinsing off the acid stain residue
Avoidance:
Use sealing and densifying ‘breathable’ coatings such as Eco Seal penetrating acrylic and Eco Densi Shield Lithium surface densifier and hardener.
Avoid non-breathable membrane coatings such as Epoxy and Polyaspartic clear coats on slabs with no moisture barrier or site with poor drainage. Exception is if Eco Seal or Eco Densi Shield has densified and sealed the surface.
Never coat very wet or damp surfaces. Maximum wetness 8% for breathable coats and 5% for non-breathable membrane coats, using a concrete moisture meter.
Remediation:
-
Grind off and repeat process taking preventative action
-
Overcoat with a pigmented opaque system
CONDITION FIVE
Outgassing from Slab


Outgassing is the escape of air that is contained within a more ‘porous’ slab into the applied coatings while they are still wet or not fully cured. Outgassing is the main cause of air bubbles in applied coatings.
Possible Causes:
-
Slab porosity leads to channels (also called chimneys, pipes, capillaries) that can function as escape routes for air to exit the slab.
-
Excess water in the slab is sometimes added as ‘water of convenience’ in the initial mix to make the mixture flow more to make spreading and slumping easier. When this excess water escapes from the drying / curing slab it can only escape through the surface. In doing so it leaves channels from the interior to the surface. As the slab heats up during a warm day the air contained in the slab expands and in doing so, escapes through the channels and through the surface.
-
Should a porous slab be coated during the slab warm-up phase, the escaping air from the expansion within the slab, creates bubbles within the coating (usually always a membrane type coating) which can burst and collapse leaving craters per the above photos. Often observed is a very small hole in the base of the crater indicating the channel from which the slab air escaped.
Avoidance:
-
Do not coat slabs with membrane high build coatings (Epoxy, HB Polyurethane, Polyurea, Polyaspartics) as the slab is warming up – this is generally pre 2pm on a warm day. Rather coat in the afternoon when the slab is in its cool down phase and then be tending to suck air into the slab rather than expel it.
-
Back rolling the membrane coating to burst forming air bubbles will minimise the cratering.
-
Sealing the surface with a penetrating sealer will minimise air escape from the slab. The Eco Seal and Eco Densi Shield assist in this surface sealing.
-
Use non-membrane type coating such as Eco Seal, Eco Densi Shield, Eco Bond and Carbon Coat. These are all breathable type coatings.
Remediation:
-
Abrade back to bare concrete if condition severe, seal and densify the surface and apply a membrane coat later in the afternoon.
-
If condition not severe, surface abrade to take off the high spots of the craters or blisters. Apply an opaque coat to the area late in the afternoon when the slab is in a cooling down phase.
Air Bubbles in Coating
CONDITION SIX


Air bubbles in a thick floor coating will tend to show as raised round bubbles. At times the bubbles can burst and collapse and leave craters.
Possible Causes:
-
Air trapped in the mixing of the 2 components or the addition of pigment because of vigorous mixing of components; this is called aeration.
-
From roller if using a foam roller or thick nap roller whipping air into the coating especially if the roller is undercharged.
-
90% of the time it is OUT GASSING from the cement
-
Osmotic blistering from excess moisture in the slab. This may take minutes or months to develop. These blisters usually contain water within them.
-
Some coating products do not de-aerate (bubble bursting properties) as well as others. Coating manufacturers may add chemicals to assist in bubble bursting.
-
Applied coating is too viscous from overage or too much delay between mixing and pouring and spreading on the floor.
Avoidance:
-
Prime or seal the surface to seal off void spaces in the cement or concrete.
-
Apply coatings in the afternoon where possible.
-
Mix components slowly in a gentle motion so as not to whisk air into the mixture.
-
If using roller application use gentle strokes with fully loaded rollers. Wipe surface with a gentle lay off stroke.
-
Back roll the surface if practical in a gentle wiping action.
-
Avoid working the coating on the floor if it is starting to gel.
-
Use thinners to extend the open time of the coating and assist bubble bursting by lowering the viscosity.
Remediation:
-
Abrade the surface to remove any raised bubbles or crater edges. This also activates the surface to take another applied coat.
-
Apply the rectification coat taking avoidance measures.
CONDITION SEVEN
Fish Eyes


Fish eyes are surface imperfections that are formed by ‘rejection’ or repelling of the applied coating by very small deposits of very low surface tension contaminants. A small speck of the contaminant is generally noticeable at the base of the fish eye crater.
Possible Causes:
-
Silicone contamination from sealants or sprays.
-
Previous abraded coatings not fully removed. Dried coatings have a lower surface tension than wet ones.
-
Low surface tension contaminants on surface or in the surface of the substrate.
-
Contamination from the roller.
Avoidance:
-
Remove all debris from surface to be coated. Thoroughly vacuum and tack rag.
-
Seal with a penetrating compatible sealer such as Eco Seal prior to build coat apply.
-
Use non- membrane coatings such as Eco Seal and Eco Densi Shield.
Remediation:
-
The only way to repair fish eyes or other imperfections is to thoroughly abrade the surface of the area, thoroughly clean the area again, making sure that you remove any surface contaminants. Go back over the area with a vacuum or clean the area with a tack rag to ensure that you remove all debris. Re-coat the floor.
Dirt or Dust in Coating
CONDITION EIGHT


Dust in coatings is a common concern and relates to the cleanliness or dust-free condition of the floor when coated. The occluded dust manifests itself as ‘pimples’ or a ‘rashing’ of the surface.
Possible Causes:
-
Poor integrity of concrete surface, i.e. friable (crumbles easily), laitance or otherwise of low surface strength. Vacuuming may even dislodge loose surface particles.
-
Inadequate or ineffective vacuuming of surface prior to coating – this is the main cause.
-
Excessive air flow in premises stirring up dust.
-
Dust from walls, ceilings or other sources.
Avoidance:
-
Use a quality suitable-for-purpose vacuum cleaner and vacuum floor thoroughly. Ensure the vacuum cleaner has no leaks.
-
Tack rag floor to scavenge any stray particles, changing rag frequently.
-
Ensure footwear is not transporting dirt particles.
Remediation:
-
Abrade surface, vacuum thoroughly, tack rag and apply another coat.
CONDITION NINE
Colour Differential

Colour differential or shading of topcoat.
Possible Causes:
-
Retouching after 15 minutes: Colour float issues arise when a pigmented epoxy has been applied and is re-touched or rolled again after sitting for 15 minutes or longer. Different shades in the colour may result.
Avoidance:
-
If material needs to be re-touched or rolled for any reason, it needs to be done within 10 minutes of application.
Remediation:
-
Back roll the entire area always using an 18″, woven, shed-resistant, 3/8″ nap roller. Always try to go across the entire area from side-to-side.
-
When possible, re-coats should always be completed with the same coating batch.
-
If batches are different, blend coloured (base) side first before adding activator.
De-lamination Between Coats
CONDITION TEN

Possible Causes:
-
Beyond re-coat window: Coating was applied beyond the recommended time for re-coating.
-
Surface contaminants: Surface was contaminated by water, humidity, oil, dust or grease.
-
Improper mixing methods: Coating was not mixed at proper ratio or for 3 minutes at minimum.
Avoidance:
-
Beyond re-coat window: Each coat needs to be applied with 24 hours.
-
Surface contamination: Check substrate carefully before applying epoxy. Remove any contamination prior to coating.
-
Improper mixing: Follow directions on labels and Product Data Sheets.
Remediation:
Beyond Re-Coat Window
-
Remove all loose or un-bonded coating.
-
Surface needs to be sanded, using a diamond grinder.
-
Vacuum to remove all dust and debris.
-
Wipe the floor with Denatured Alcohol. Follow all safety instructions.
-
Re-apply epoxy following Product Data Sheet instructions.
Surface Contamination
-
Make sure surface is clean and dry and free of any contaminants prior to coating. Vacuum or mop any water or dust.
-
Oil and grease must be removed using a degreaser.
-
Make sure the surface is dry before applying another coat.
-
If surface coat has been on longer than 36 hours, you must diamond grind the floor dull.
-
Remove any dust from surface by vacuum.
-
Wipe surface with Denatured Alcohol. Follow safety instructions.
-
Re-apply epoxy coating following Product Data Sheet instructions.
Improper Mixing
-
Remove any loose, peeling or uncured coating.
-
Any uncured coating must be solvent wiped with Denatured Alcohol or Acetone per instructions.
-
Diamond grind the coating.
-
Vacuum the surface to remove dust and debris.
-
Solvent wipe surface with Denatured Alcohol.
-
Re-apply the epoxy following Product Data Sheet instructions.